So, again, it’s been awhile since my last post. I am going to attempt (no promises!) to post more regularly for at least the next few months. For this post, I am going to describe one of my newest ways to fix a quick, tasty meal without having to cook more than turning on the oven, or even dirty a pan much. You may have tried this before, but making a pan sized pizza using a flour tortilla is a great option for a meal.
I make pizza the standard way, though my favorite quick dough has become impossible to get, as least as far as I have found so far. I have tried the pre-made dough balls, but while that is fine to use and tastes good, it can take a bit of time to spread out, especially if you have family that prefers stuffed crust. BTW, if you do want to do a stuffed crust pizza, don’t use shredded mozzarella cheese. Use the solid block (I prefer the whole milk, but skim milk mozz is fine too). Cut it into logs as thick as you want, and roll the crust around it. Shredded just comes out onto the pizza, it never stays in the crust.
My toppings tonight, an iron pan that fits just right, and a pizza ready for the oven.
If you use this flour tortilla style pizza (or really, any tortilla is fine, you pick), then you will have a very crispy crust, and no stuffing option. However, it is super easy. I like using pesto as a sauce, because it is a little drier and doesn’t make the tortilla as moist, but tomato sauce works fine too, just be really careful not too use much. Then you just top with your favorite toppings. When using spinach or other delicate green topping, one tip is to make sure not to put them right on top, as they will burn in the high heat for pizza. If you have a cast iron pan, that is the best option, but a baking sheet is fine too. I cook the pizza at 425 or 450 degrees, and it cooks in about 10-15 minutes (depending on how you like your pizza – its a good idea to check it after 8 to 10 minutes, then keep checking until it’s done the way you like; once you learn the time you need for your pizza, you can use that time).
A quick and delicious way to have a personal pizza!
So, November is a crazy month when one is working and finishing up class projects!
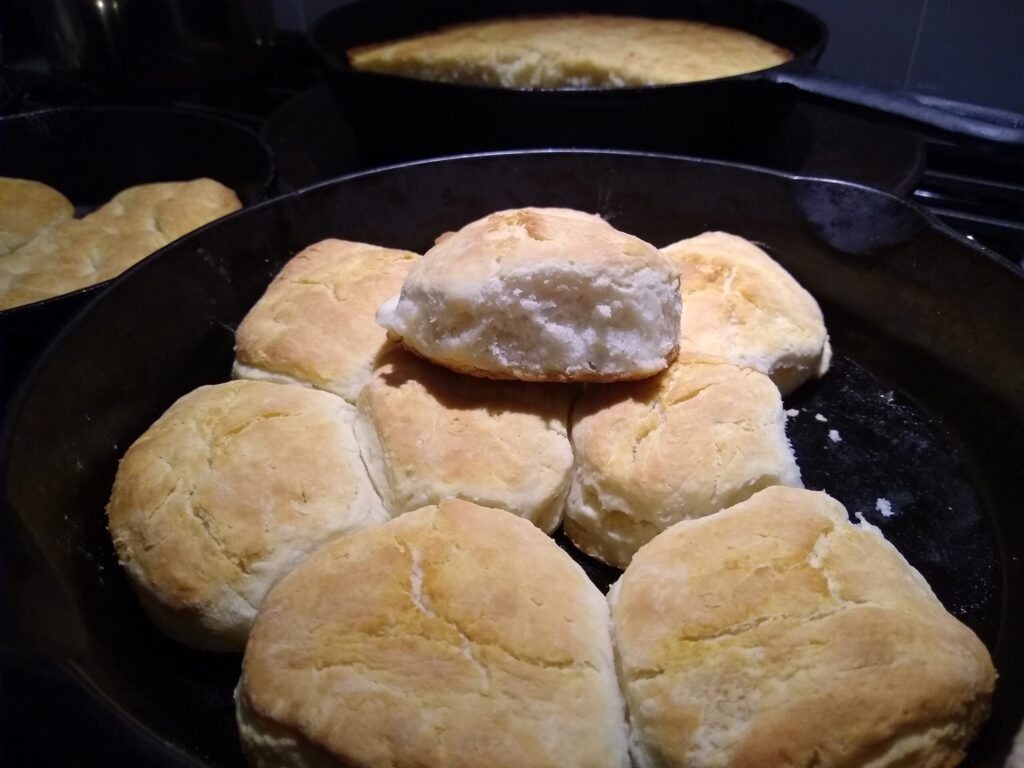
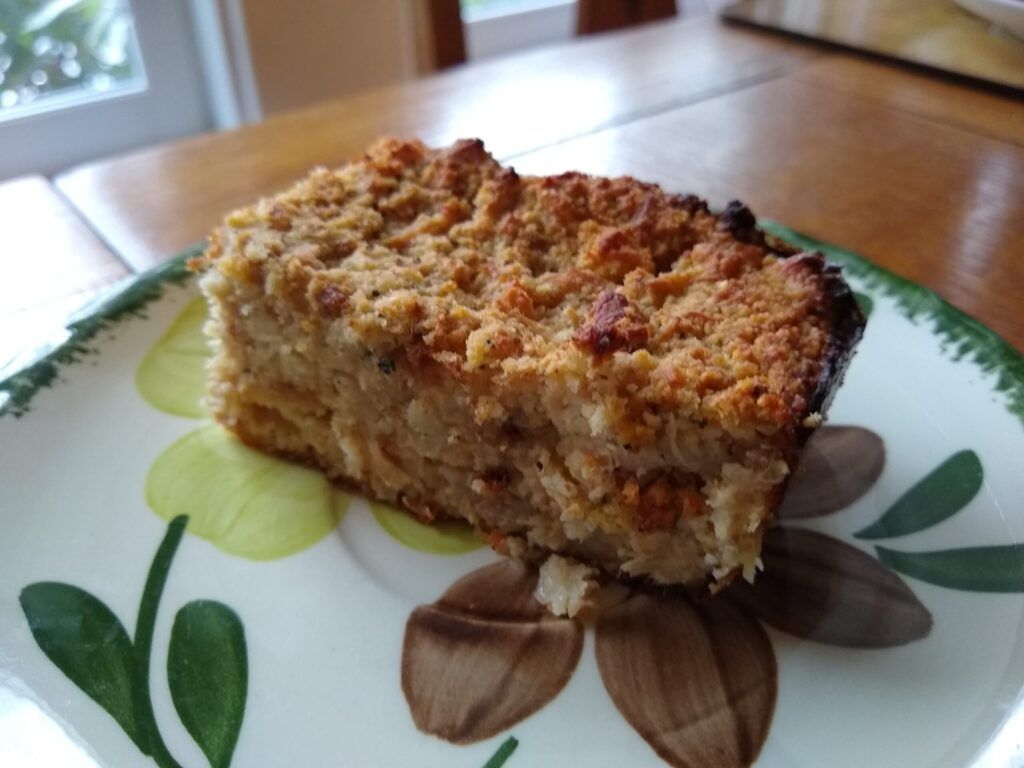
I have neglected posting this month because of being so busy with class projects while coordinating the end of semester with my work schedule. Since there is no way for me to do a full post this month, and since it is getting close to Thanksgiving, I will link to these posts from last year (when I didn’t have 2 jobs to coordinate; ah, the simpler times of full-on pandemic!). I will be making my Grandmother’s biscuits and dressing again this year, so I want to re-up my recommendation for them. If you are in the southern US, then you can get White Lilly flour and make these yourself. They really are the best!
I am late in getting this new entry posted, but I have been learning new things at a quick pace! I wanted to share two resources for anyone wanting to learn how to work with Excel sheets or how to code for websites. My class work lately has been heavy on website design, and my work as a graduate assistant has required more detailed knowledge of using Excel sheets than I had previously known. Like everyone else, I turned to the web to see what was available (and yes, I am in graduate school, but they expect me to find a lot of this information myself!). After trying several different avenues, I found two resources that I wanted to share. I have found both to be very helpful with learning and practicing new skills, so if you are interested in either, check these out!
The first is learning Excel. If you are like me, you probably have done some basic work with Excel, but never really needed to go very deep into its various uses. There are a lot of people who have to learn Excel for a job, but most people don’t deal with numbers and statistical analysis every day. However, if you want to gain a new skill on your own, I have found a set of YouTube videos that helped me a lot when working with Excel files. The person who presents these videos has a website with other resources as well, so I am going to include links for both his channel and website at the end of this section. The title of the video set is Microsoft Excel Tutorials for Beginners, and there are about 13 total videos. However, you can pick and choose which videos interest you, depending on what you want to learn. The presenter, Jamie Keet, provides a timed overview of each video, most of which are around 20 minutes. The overview allows you to jump to the sections you want to hear, or perhaps re-hear, without going through the entire video. His video is easy to follow, and he doesn’t make assumptions about what you already know. If you already know how to work with certain parts of Excel, you can always jump to the next section. (I recommend listening to the whole thing first, he provides little time saving tricks you might not know.) Mr. Keet also has a website/blog called Teachers’ Tech that has other helpful content for those wanting to learn about digital resources. I highly recommend the videos!
My second recommendation is for learning HTML and CSS coding. To be honest, most people probably don’t need to learn coding if they want to create a website or use most modern digital media. However, learning is always fun, and it helps you understand how websites work. If you are using a CMS (Content Management System) like WordPress, Wix, or Weebly, learning how coding works can help you make better decisions when you are creating your digital works. And really, at least you will know why the darn thing won’t do what you want it to! For learning coding, my biggest help has been W3Schools. This website is run out of Norway, and started in 1998. It has all different types of coding lessons, and the tutorials are very simple. Some people might think they are too simple, but I have found them easy to understand and quick to go through. You will need to practice your coding by writing code (I use Atom, a free download coding software, but you can easily just use Notepad if you are on a PC). The main thing about the way this teaches coding is through gradually taking you though each part, and allowing you to open up a practice page. On the practice page you have the code on one side, and the webpage result on the other. This makes it very simple to change something and see the result right beside the code. I wouldn’t try to do much writing on the Example pages, but once you get the idea, you can work on Notepad or any other code software and try out what you are learning. If you just want to dip your toes into coding, W3Schools are really nice to use.
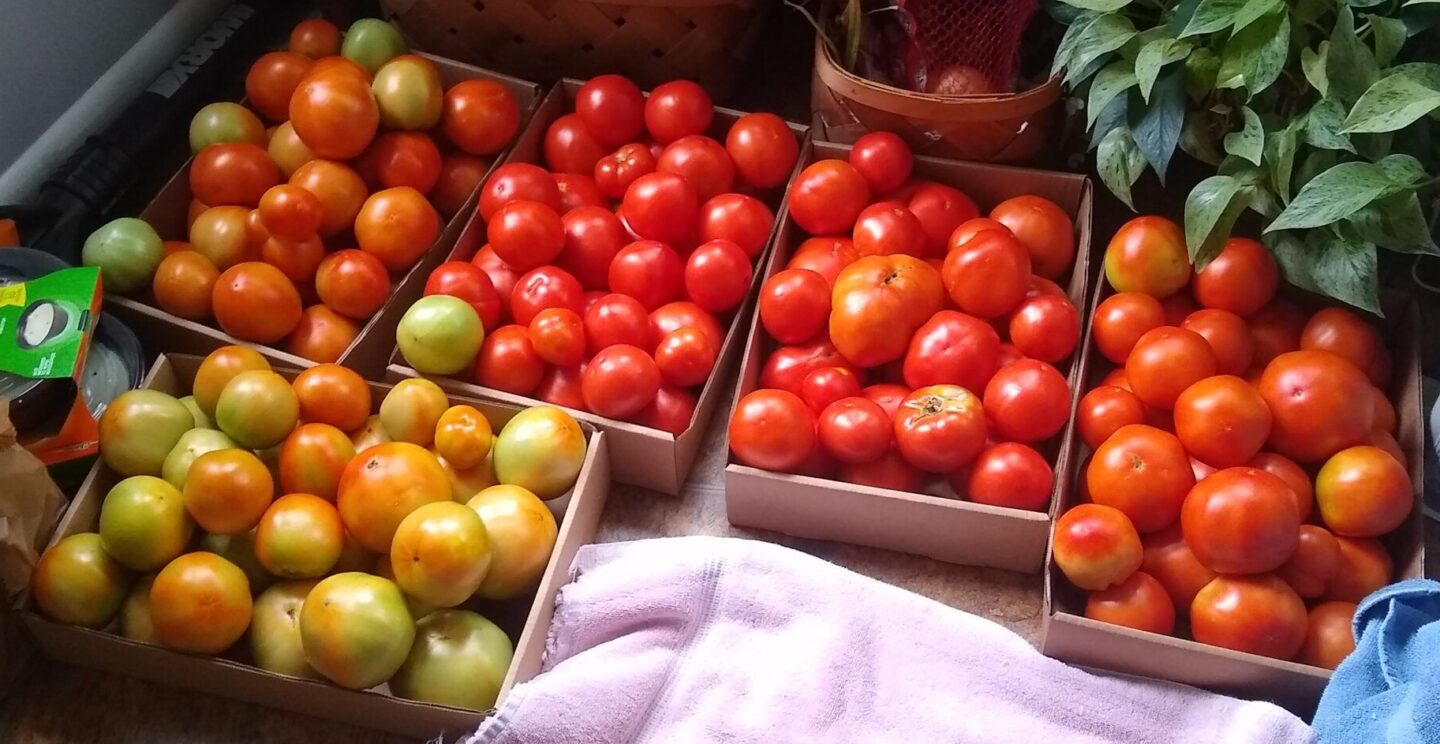
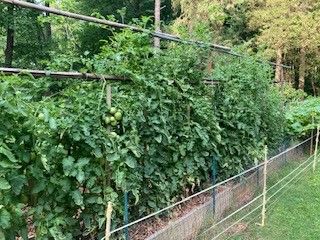
This post is going to be about tomatoes – yes, it probably would have been better to post this in July or August, or better yet May, when tomatoes are planted in this area! However, I don’t really do the planting and tending myself, I do more of the cooking. So for me, tomatoes are really more of an August crop, when I start to do a lot more cooking with them. (The first tomatoes are mainly for eating fresh, after the long months of having to settle for store-bought tomatoes. If that is all you have ever eaten, I feel your pain!) If you have read some of my earlier posts on gardening, you know I am not really the gardener of the family, that’s my mom. She has planted a garden every year since I was 4 years old, and tomatoes have been grown every year. And I’m not talking two or three plants. Generally the number has only gotten higher over the years, and for the last 20 or so years, its been anywhere from 40 to 60 plants. Usually about 45 is the average, and this year it was only about 37 plants. Mom went on a 4 week trip out west this summer, so she decided to ‘down-size’ the garden. (I argued, I was over-ruled. I had to do some of the picking while she was away – not my favorite thing in late July!)
So when I say ‘*some personal experience’ let me clarify that to say that I have seen how tomatoes grow since I was a kid, and I know the work someone else has done on a daily basis. What I don’t do is the main planting and tending! But I have seen a lot of the experiments tried, and on this post I’ll just share one – suckering – that is fairly easy to do, especially with just a few plants. It is also a great benefit if you are planting in a small area, because suckering helps contain the size of the plant. If you are interesting in reading more about the process, this link is a study done by Cornell University using the practice to increase yield. If you have grown tomatoes before, and never suckered them, you probably had a big plant with lots of leaves. At full size, they look like a leafy bush. Suckering prevents a lot of that leaf formation, so you will see the main stem of the plant the whole growing season. This has the benefit of allowing air to circulate, keeping moisture from causing disease, especially in areas of high humidity (hello, North Carolina). However, if you have never done it, the feeling early in the process is that you are going to either kill the plant or not have any tomatoes. I promise, done right, suckering will actually help with production!
A leaf sucker is just beginning to grow from the growth point, at the best time to take off – Tomato plants just after being staked for support
When growing, a tomato plant will put out alternating leaves on each side as it grows up, and each leaf will begin a new stem that grows out from the main stem. As that stem grows bigger, another small leaf will form at the juncture of the main stem and the side stem. That new leaf is a ‘sucker’. It too will grow into a new stem. This will happen at every stem juncture, for the entire early growing season. Basically, you end up with a bush that has multiple large stems. ‘Suckering’ is removing that extra leaf before it has a chance to grow into a new stem. This way, you keep one main stem at the center of the plant, and all side stems are limited to just one on each side of the main as you go up. Since you prevent the plant from putting effort into all that green stuff, it puts more effort into fruiting. As a gardener, you want the fruit, so suckering means you get bigger tomatoes when you sucker for the first 6 to 8 weeks of growth . After that it usually isn’t worth continuing, since most of the plant growth will go into producing fruit (there may be a small drop in number, but their greater size will more than make up for it).
Tomatoes planted about six weeks in 2020 – Tomatoes planted about 8 weeks in 2021
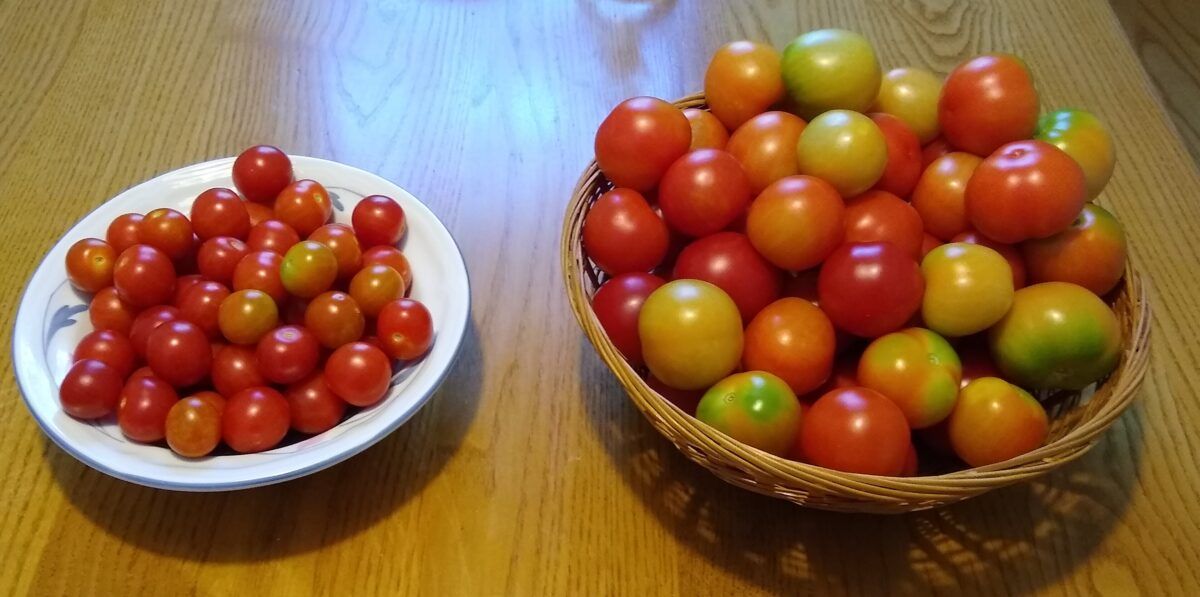
What does all this mean? Well, usually we don’t bother to sucker cherry tomatoes that we plant, because they are supposed to be small, and the plants just grow too fast to bother with the work of suckering them. However, last year mom forgot which plants were cherry and which were regular tomatoes in a small section, and suckered one row of the cherry tomato plants, while leaving the others to grow out. So we had a natural experiment. All the cherry tomatoes were in the same area, they all got basically the same water and sun, and we harvested tomatoes from both plants. Here is a picture I took comparing them side by side. Remember, these are the same type of cherry tomato, the only difference is that one set of plants were suckered, and the others were not.
One of the areas I have been focused on learning during my graduate work is digital technology. While I have been familiar with the general Microsoft products and use the internet for many activities and work, there are always new things coming out that I wanted to make sure I learned while I was getting a new degree and discovering a new career. While it may seem strange, I used digital technology a bit in my museum job, especially in research, but also in creation. I worked with the behind the scenes systems that any museum has to use to reach its visitors, and in general, I like the combination of face-to-face interaction combined with digital outreach. Each has a place, and strengths and weaknesses. The job of a programming designer is to know the best way to use both. So during my graduate work, I have been pushing myself to learn new things, and take chances when I can. This website is a direct result of that. When given a choice, instead of just creating a student profile as a digital page, I decided to create a full website and blog. It might have been a throw-away option, but I decided that there was no point in going small, better to go big and learn as much as possible in this new realm!
I can easily say that was the best decision I have made so far in my graduate work. By forcing myself to learn how a website is put together (I will admit there was a bit of cursing, but it was privately!), I have been able to work better and with more focus on later projects, such as creating a LibGuide. After that choice, it also wasn’t hard to go ahead and spend the money for a video editing software package after researching the options and asking a professor for advice. I decided to get Camtasia, because that software had a lot of support online for helping me learn the techniques, and a professor used it a lot and recommended it as a solid video editing program.
And so began my efforts to learn video editing. I will admit to being unsure about whether I had made a good choice at first, since there are a number of free video apps available, but over the last two months I have come to see I made a good decision for learning how to do this work. And I also have come to really like doing it! Video creation and editing is a bit like making a puzzle – there are a lot of little parts that have to fit together to create the whole picture, and you have to look at them individually and see them as a part of that whole, even if they don’t look like the fit at first. The first video I created was a simple instructional video, to describe how to do a Boolean search. For the second I had to film myself giving a book talk, then edit the result (I added an entrance shoot, so I learned how to cut and paste in that section,) The next two efforts were considerably better, a Book Trailer and a PSA about the importance of public libraries.
For the book trailer, I pulled images from the book I had chosen in my Children’s Literature class. The storyboarding process was simple, creating the basic outline I wanted for the trailer. Then I used Microsoft 3D Paint to create effects and the still images I needed. From that point, everything was about the editing process, putting the images in order, layering tracks to create the narrative for the trailer, and then picking out music and layering it onto the video. I really enjoyed the process, and I learned a lot while I was doing it.
The next project, the last to date, was a PSA that I entitled Public Libraries: They’re Where It’s At! This one I had six tracks layered together, two sound and four video. Working with the pacing, and playing it over and over to make sure that each picture and effect was up just long enough, but kept the video moving, was the trickiest part. But I think the result wasn’t bad. I still have a lot to learn, but this is a skill that I believe will continue to be useful in many areas, and especially in Outreach Programming.
Ok, so this is a longer post than I planned, but hopefully it holds your attention. I expect a lot of people will think it can’t possibly be fun to study weights and measurements, but I promise you, it really is! There is a lot of interesting trivia, and its not just that the US doesn’t use the metric system like the rest of the world. In this post, I am going to link to a lot of different sources, but hopefully I can convince you that this subject is worth reading about!
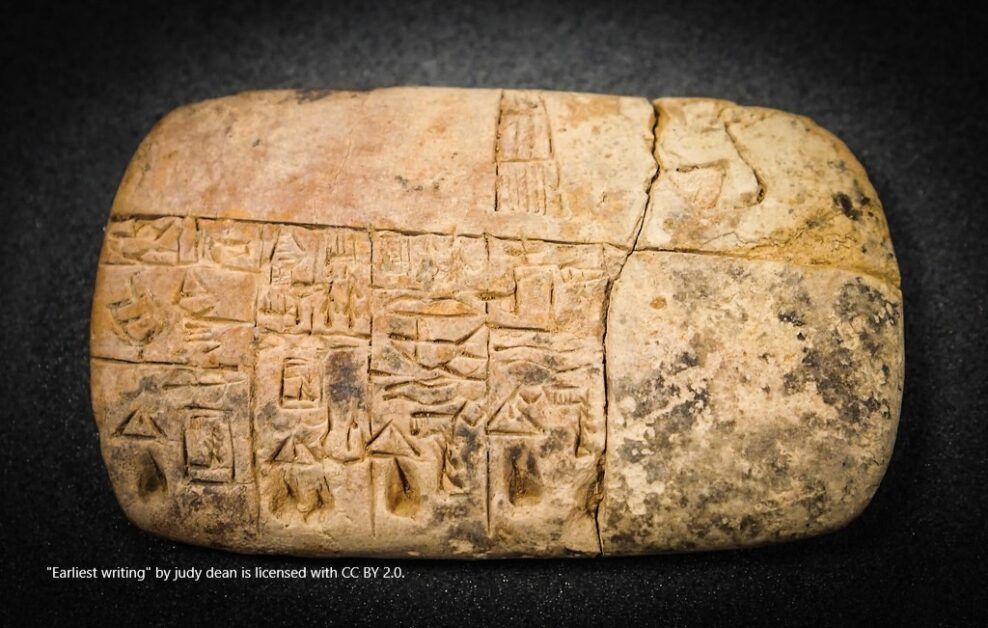
Weights and measures are actually more important than we think. Its not just that we use them everywhere, they also help society run smoothly. The first writing that has been found was used to keep track of weights and measures, so that people knew how much was paid and owed for goods, services, and taxes. It has been assumed that writing was developed to keep track of these things in settled groups of people, the first ‘civilizations’, at least as we judge them today. So it is hard to overstate how important weights and measures are to a society. In just the last few years, scientists have officially begun to shift away from a physical thing to represent the prototypes of weights and distances, to a mathematical calculation based on universal constants. If this sounds a bit crazy, just consider why they need this. In a physical object, such as an official object to identify a kilogram, there is some loss or gain of mass over time (in terms of atoms- these are some small numbers, folks!), no matter how carefully it is stored. With the need for the absolutely precise measurements needed by today’s standards, basing units of measurement on something that never changes is essential! This change was just approved in 2019, after years of work to establish the calculations. If you want to read up on this, here is a link to a story on Vox about the process.
Early writing from Mesopotamia
This brings up a particular point about the metric system, and the United States still using imperial weights and measures. The ‘Imperial’ system is based on our use of the British-style weights and measures, with all of its inconsistencies between types. (What inconsistencies? Just consider how many ways you can divide an inch – by thirds, fourths, eighths, sixteenths. Then look at the pound, as compared to volumes, etc. That is a lot of different types of conversions!)While it is true that the basic system is hundreds of years old, there were almost uncounted ‘imperial’ systems in use until the mid 19th century, and they all differed not just by country, but also by the product being measured, and even by the city of original shipment. Basically, there were a lot of differences! In the 1790s, the new French Republic wanted to use the same system across its territory. The result was the metric system. So the metric system is older than you might think. It is also what our imperial system is based on today, after a treaty in 1875. You can read about the history of this creation in Pys.org.
Oh, you thought we didn’t use the metric system? Well, actually, yes we do. All our weights and measures are based on those metric prototypes that are being recalculated now. So really, even though you might think you are working with inches, feet, ounces and pounds, actually, your numbers are all percentages of centimeters, meters, grams and kilograms. A pound is 0.453592 of a kilogram; there is no other definition of it in science, no ultimate prototype pound. And if you wondered why everyone else has come around to this system, its because it actually is a lot easier to calculate with than the imperial system. And I know, everyone wants to say ‘No, our system is easier!’ But really, we already had this argument, and the other side won, it just took a long time to convince everyone.
In 1792, the new constitutional government of the United States had to make a decision about creating a new national currency. Under the previous Articles of Confederation, each state ran its own monetary policy, and rates of exchange across the new country were based on the British pounds, shillings, and pence (even though the most common coin used was Spanish; trust me, this is just the tip of the iceberg on complications to monetary policy!). When the federal government had the chance to start fresh, the decision was made to push everyone to switch to a new system based on a decimal system. What does a decimal system mean? It means we use base 10 for calculating money divisions, so 100 pennies is 1 dollar, and so on. What does this sound like? You guessed it, meters and kilograms! 100 centimeters is 1 meter, 1000 grams is 1 kilogram. All in base 10, because it makes calculating and conversions much easier. (Can you guess why base 10 and base 12 are so commonly used? It’s right in the palm of your hand; well, actually your fingers. Ten fingers makes base 10 natural. Now look at the fingers-not thumb, you count with that- of one hand, and the number of segments in each finger – 3 X 4 =12.) If you want some in-depth mathematics, The Story of Mathis a great documentary on the development of numbers, counting, and why it is so important. It can get pretty complicated, but it’s still a really good series. (You can find it on Amazon Prime, but the link I have here is to the Films on Demand catalog, which is available to most people through public and academic libraries.)
19th century Trade Card/ Spanish Milled Dollar or Peso
However, don’t think that the new system put in place for money in 1792 was adopted quickly! Oh, no, they didn’t want to change any more than we do today. As a result, from the 1790s through at least the 1820s, and in some areas into the 1840s, there were plenty of people still using the old money calculations. I have personally looked at store account books from the 1820s that have (what I presume is) a younger clerk using dollars and cents for a sale, and the next entry the sale was recorded in pounds and shillings. And for every shilling, you had to calculate 12.5 cents, and then do all the conversions to total the accounts at the end of the day in dollars. Even later, in the mid 1800s in New York (and I will promise to update this blog when I relocate this source) I have read a newspaper letter to the editor from a citizen who stated that if stores and companies would stop using base 12 for product packaging, maybe people would switch over to the decimal system for money completely. Poor man, he would still be disappointed in us today. When was the last time you bought 10 eggs at the grocery? (The reason for packaging by the dozen in English products? Because there were 12 shillings in a pound, and that made products easier to calculate packaging divisions for selling. Why 13 in a ‘baker’s dozen’? Because in the 16th century English bakers were under-weighting their bread, and instead of risking a hefty fine for an under-weight dozen, they just threw in an extra one.) So you see, it is really hard to get people to change once they get used to something, especially a system they use every day.
If this has gotten you curious about the history of weights and measures, or you want to see some of those many different Imperial weights and measures that were used before metric, one of the better sources I have found is from a professor of mathematics at UNC-Chapel Hill. Dr. Russ Rowlett is retired, but his Dictionary for Units of Measurement is still up, and provides a great, easy to understand list of weights and measures from antiquity to today, as well as conversions where possible. If you are like me, it’s fun just to read. But I have also used it for research when needing to understand primary source material from the 18th century. If you are interested in currency history, try the American Numismatic Society or the U.S. Currency Education Program. And finally, if you really want to see how long a group known for accounting, money, and business can hold on to a system long after it is out of use, just take a look at the New York Stock Exchange. If you ever wondered why the ticker at the NYSE used fractional divisions of stock (instead of decimal divisions) until the beginning of this century, it dates back to the old weirdness I mentioned about the states using British accounting and Spanish coins. Spain divided its peso, or milled dollar (which America based our dollar size on) into 8 reales. Spain minted a lot more gold and silver coinage than anyone else during the 1600s and 1700s, so everyone used their coins, including us. New York state didn’t like the quarter division of the American dollar that was decided on in the 1790s, so they stuck with the 1/8 Spanish division into the late 19th century. The NYSE didn’t change it’s use of fractions until 2001! (What is 1/8 of a dollar? – 12.5 cents. And the Spanish reale was called a ‘bit’, so 2 bits was equal to a quarter. See how much fun this is?)
So, it’s been a few weeks since I posted. This is what happens to me when I am devoting my writing inspiration to graduate classes! I had intended to post this a little over two weeks ago, so it’s a bit late. However, the season for being kind to bees and other pollinators is all year long. That means you can use these suggestions for any time you are considering planting or taking care of plants in your yard.
About 10 to 15 years ago, we started to plan our decorative plantings a bit more carefully. Like most people, we had picked out flowers we liked, and included a lot of perennials. (If you don’t like taking care of plants, but you do like having them around, native perennials are the best choices; you are mostly limited to seasonal maintenance in the spring and fall.) At that point, I started working more with planting and gardening at the museum I worked at, and researching native plants became a bigger part of my job. As a result, I started looking at using them more at home as well. I am at best a lazy gardener; the less work I have to do for upkeep, the happier I am. I will do a lot of pre-planning to keep from doing maintenance, and I don’t use pots at all, because you need to water them every day, or even twice a day, in the southern heat. For that reason, the more I read about native plants, the better I liked them. Picked to suit a space, they need less watering, less weeding, and provide more for wildlife than any hybrid or non-native species.
The ability to provide spaces and food for pollinators is what I am going to concentrate on for this blog post. Most of the showy, constantly blooming annuals that you can purchase at a plant store are no good to bees and other pollinators. The effect of hybridization often reduces the production of nectar for many plants. The other problem is grass. When people grow grass that looks like carpet (often by using pesticides and herbicides) it decreases the amount of food that pollinators have available to them. While that type of lawn may look good to human eyes, to a bee it looks like a desert.
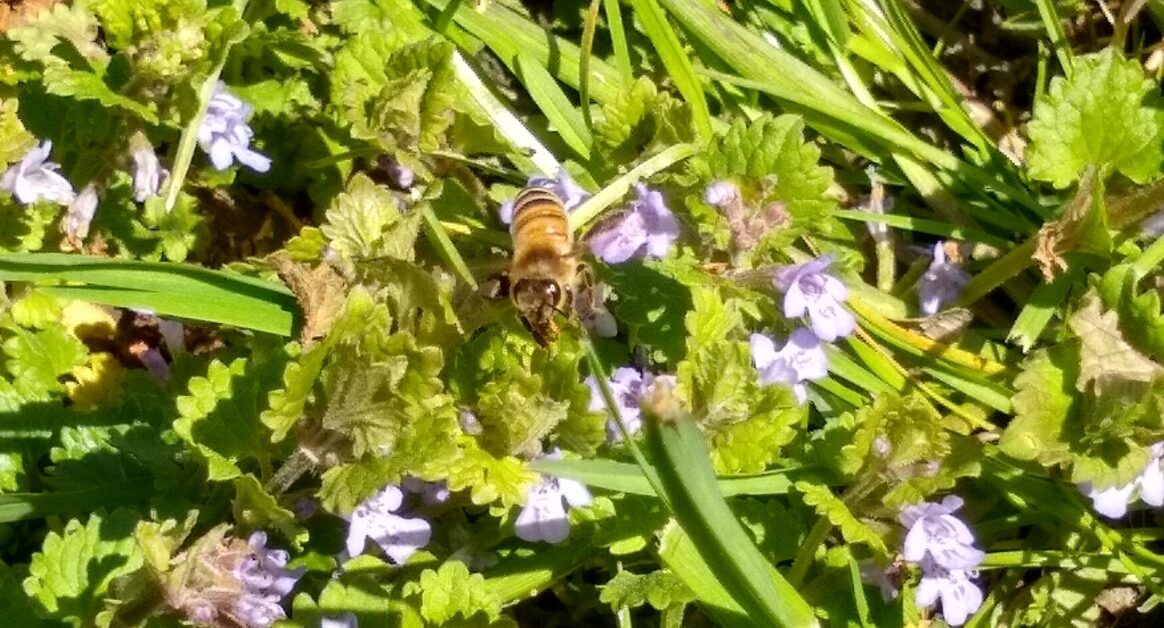
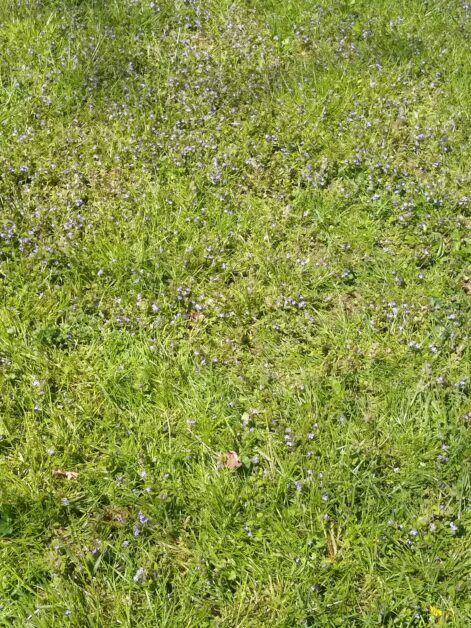
Honey Bee on the lawn – Some grass, but a lot of ‘weed’s in the back lawn
This is what a bee and other pollinators would consider a nice lawn. It has some grass, but there is a lot of other ‘weeds’ mixed in, many of which are the earliest blooming flowers in the spring. I saw honey bees for the first time this spring in mid-March. By early April, there was enough blooming in the lawn that honey bees, bumble bees, and and native bees like miner bees were getting a lot of nectar from the broad-leafed weeds in the lawn. I know that a lot of people don’t like these type of plants in their lawn. However, you can really see the benefits of them in the spring, before a lot of the flowers that people like to plant have started blooming and you see how many pollinators are using them. The flowers in the photos are from a plant called ground ivy. I will be the first to admit that it doesn’t look the best in the yard, and it will send out runners to plague your flower beds. However, I have made peace with my need to get rid of it just because I don’t like its looks. For me, it is more important to create areas for local pollinators, especially since I need them for food production. I think that is a fair trade-off, especially since it allows me to continue to be a lazy gardener!
Golden Ragwort in spring – Bee Balm in summer – Aromatic Aster in October, the latest blooming native aster
When it comes to other ways to help the different species of bees and other insects, there are a number of ways to plant for them throughout the year. Native species of plants will only bloom for certain periods of time during the year, so having a variety that blooms over the span of the growing season takes some planning. My mother and I have looked for plants native to North Carolina, and concentrated on making sure the variety covers March through to late October. There are also lists of plants that are popular with pollinators, and you can pick types that appeal to you and the bees. The best resources to find these plants are usually local Ag Extension agencies or native botanical gardens. If you don’t mind waiting a little longer, seeds are a very economical option for planting. Personally, I don’t like wildflower mixes that you can find in chain seed stores. Often, those seeds might be native somewhere in the US, but not necessarily your area. If you have a huge area you want to plant, they might work, but if you buy several different seed packages of local wildflowers, and mix them up yourself, you’ll usually get a better result. An added benefit is that most native annuals will reseed themselves, no need for you to plant new each year (I told you I was a lazy gardener). For those in NC, a good source of information on native plants is NC State University Extension or the Botanical Gardens at Chapel Hill. If you are wanting to look up plants or resources in other states, one of the best options is the Lady Bird Johnson Wildflower Center in Texas. This site has information that covers all of the US, and you can look up plants by a wide variety of options, such as state, color, size, type, and many others.
In addition to plants, bees can use a few other things, especially if you are trying to help their survival year-round. Leaving some open dirt is good for miner bees and other native bees that use it for nest building. Dead wood, brush piles, and the dead stems of plants left on instead of cutting away in the fall, are also good ways to help pollinators (and other wildlife) have a place to stay over winter or build nests in the spring. If you have a bird bath, put a rock in it that sticks halfway out of the water. This allows bees and other insects to drink during the dry times; they need a way to walk up to the water without falling in, and most bird baths are too deep.
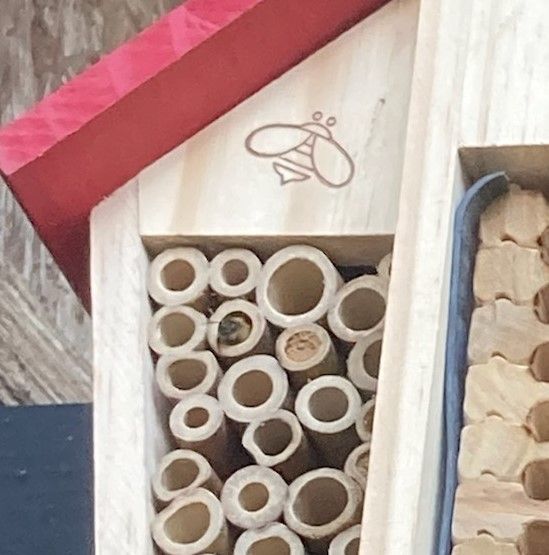
There are also bee houses for native bees that don’t build hives you can put up (just make sure you have some dirt/mud around for them to use). We put one up just this spring, and got it up just in time for the bees to start using it. You can see one of the bamboo openings already closed up with mud beside the bee sticking its head out. This was just three days after we put this house up near the vegetable garden. There are already about 20 openings covered in 3 weeks, so the house got put up just in time! (This is a miner bee. The bees have liked the smaller bamboo openings this year!)
If you want to find out more about pollinators, and how to help them survive and thrive in you yard, the Xerces Society is a good source for information. They have advice for general plantings, pollinator needs, and even a certification system for those wanting to spread the word about a commitment to cultivating pollinators. There is also a lot of information about attracting butterflies, and specifically the monarchs. Here’s another advantage of being a lazy gardener – longer lawns and leaf litter help fireflies, since they spend the daytime at the bottom of grasses and in leaf piles. There is nothing like looking out in the early evening in late May to see the first fireflies rise from the yard and woods. It signals the beginnings of summer! There are a lot of ways to help cultivate pollinators around you. And don’t worry about bees around your house (unless you are allergic to bees; you’ll have to decide what you feel safe doing where you are spending a lot of time outdoors). Those bees don’t care anything about you when they are looking for flowers. (I’ll write a post later this summer about how to avoid wasps, yellow jackets, and others considered dangerous; hint, they’re really not when you consider what they are looking for at different times of the year). As long as you don’t get in their flight path, aren’t swatting at them, and avoid smelling like their food source, they will leave you alone. (Avoid flowery perfumes, shampoos, and sugary smells if you plan to be outside with the bees; if you do, it’s not their fault if they come take a look!) I’ve stood watching bees at flowers from less than a foot away, and they never paid the least attention to me. Watching bees is one of the great pleasures to having a pollinator garden.
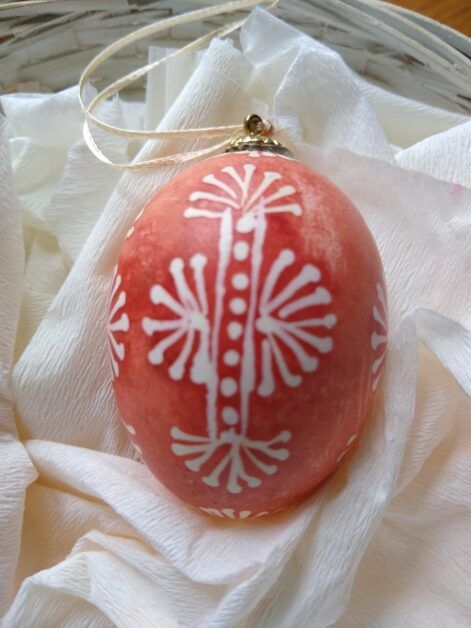
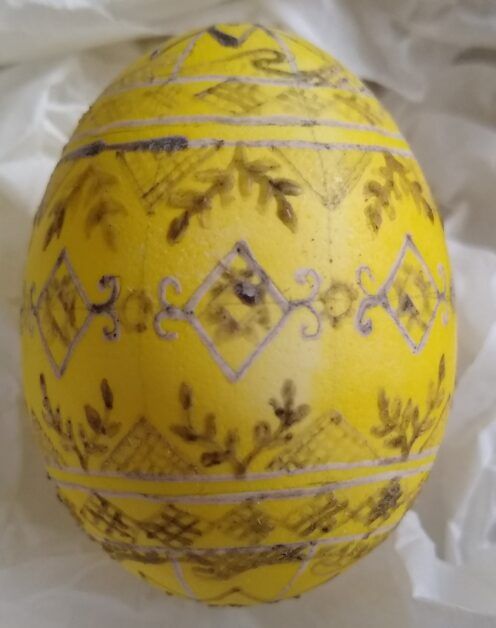
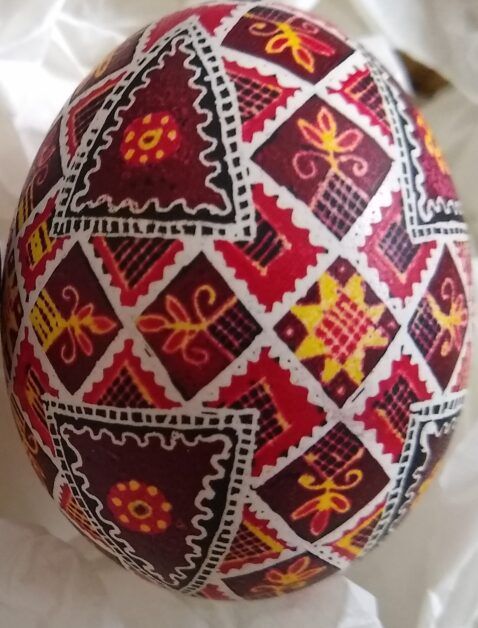
I am one of those people who like to try a lot of different crafts (hence the name of this blog-A Little Bit of Everything!), and a number of years ago I decided to try making those really decorative Easter eggs called pysanky (all the pictures on this post and in the Gallery are eggs I have made). There are actually a lot of eastern European cultures that decorate Easter eggs, and the word pysanky is particularly Ukrainian. I have tried a number of other ways to decorate Easter eggs, and I’ll describe them below. Pysanky are one of the most elaborately designed forms, and it takes more time and equipment than many others. First, let me give a short history of coloring eggs for Easter. Eggs as a symbol of the renewal of spring goes back centuries, and while it is now associated with the Christian Easter, the tradition predates Christianity. Dyeing those eggs different colors also has a long history, and scratching a design into the dyed surface probably dates back just as far in time. It would be hard to document when exactly decorating eggs with multiple dyes in patterns using wax began, but it also has a long history. There was even an early form of the Easter bunny in Germany, called the Osterhase (Easter hare); a painting of the Osterhase carrying a basket of dyed eggs has been found in Pennsylvania from 1810 (link to image). PAAS egg dyes weren’t sold until 1893, when new dyes could be produced and sold in tablet form, and dissolved in water and vinegar. Like many traditions that were done on a smaller scale before the 20th century, the industrialization of materials and shipping allowed Easter egg dyeing to be done on a large scale. While more people were dyeing eggs, the skill and time to create the more intricate designs made that tradition stay confined to a smaller group of people.
The dyes used to color eggs before the mid-19th century were similar to dyes used for other products, using concentrated plant, animal, or mineral colors that could be made at home or purchased in the store. The production of the modern aniline dyes using coal-tar as a base began in the 19th century, but the wide use of them for most dyes didn’t really take off until the second half of the 1800s. Some of the commonly purchased dyes for eggs were cochineal, madder root, and turmeric. Other colors came from cooking at home, such as red cabbage juice, spinach juice, and onion skins. Some of these colors are ‘fugitive,’ meaning that they fade over time (sometimes a very short time if left in sunlight). Others last a long time if they are protected from strong light. I have tried all of them, and there are different techniques to using each dye to get the best results. Some work better hot, others work best cold after aging overnight, and many need vinegar as a mordant (a substance that allows the dye to stick to a surface). You can also get good results from combining certain colors to get others, just like you would with paints. For instance, red cabbage juice actually gives you a wonderful blue (as long as it ages 24 hours before use) but if you add yellow turmeric to it, you get green eggs. When I worked at the museum, we would do egg dyeing for Easter, and over time I experimented with many of these dyes.
The easiest one to try without too much effort is to use onion skins. You need a lot of yellow or red onion skins, but if you are using onions regularly in cooking just save the dry skins in a bag. You can dye the eggs by boiling them with the onion skins for a deep orange, or add vinegar and iron (just put in an iron vitamin) to get a dark brown. Or you can soak the onion skins and wrap them around the egg in layers, using string to hold them on the egg, then simmer for up to 1 hour or leave in the dye overnight. After the eggs cool, unwrap the onions skins and you will have a tie-dyed egg!
If you boil the egg for at least 30 minutes to an hour, and make sure it is stored where air can get to it (not in a plastic or styrofoam container), it will usually dry out inside over several months to a year, and can be kept indefinitely. The inside will gradually become a hard center, so you need to be careful not to shake it (I have broken them by not being careful, as the hard center acts like a little marble inside). I have seen decorated eggs, kept carefully, that are over 150 years old.
If you want to try something that takes a bit more time, you can scratch off the dye to create a picture on the egg. This works best with a single dye color, and the darker the dye, the better the design will show up. This can be done with most dyes, because the dye sits on the surface of the egg and scratching it with a pin will reveal the white of the egg below the dye. You want to make sure to boil the egg before doing this, and you need to get the feel for how hard to scratch with the pin, but you can get elaborate designs if you are willing to take the time. (This egg is dyed with red cabbage juice.)
Another technique is to use a straight pin to apply beeswax to a boiled egg, by heating the head of the pin in a candle flame and scooping up a small amount of beeswax, then creating a design on the egg before dyeing it. The wax will preserve the white color below it, and you melt off the beeswax to reveal the design. (This egg was dyed with madder root.)
Pysanky uses multiple dye colors with beeswax to preserve sections of each layer of color. In this technique, you gradually apply the dyes starting with the lightest color, then proceeding through to the darkest to create a finished design that can be very elaborate. The wax is applied using a tool called a kistka, which is a small funnel attached to the end of a handle. The funnel is heated in a candle flame, then used to scoop up beeswax. You then use the narrow end of the funnel to apply the wax to the egg, creating simple to elaborate designs with the wax. Any dye under the wax will not be dyed with the next colors. Other than the steady hand needed to apply the wax, the main skill with this technique is planning the design. You have to create the design knowing which color each part will be, and make sure to apply the wax in the order of the dye colors. You can’t go back to a lighter color once the darker dye has been applied. Pysanky design books give the instructions for which designs to apply with wax after each dye bath. At the end of the process, you gently heat the wax to melting point, and wipe it off to reveal the design (I’ve done this with just a candle flame, but you can also put it in an oven set on 100 degrees). If you would like to try to make pysanky, I recommend this website by a family who originally came from Ukraine and now sells dyes, design books, equipment, and even finished eggs.
Delrin Kistka – Pysanka with one color and two layers of wax – Finished Pysanka
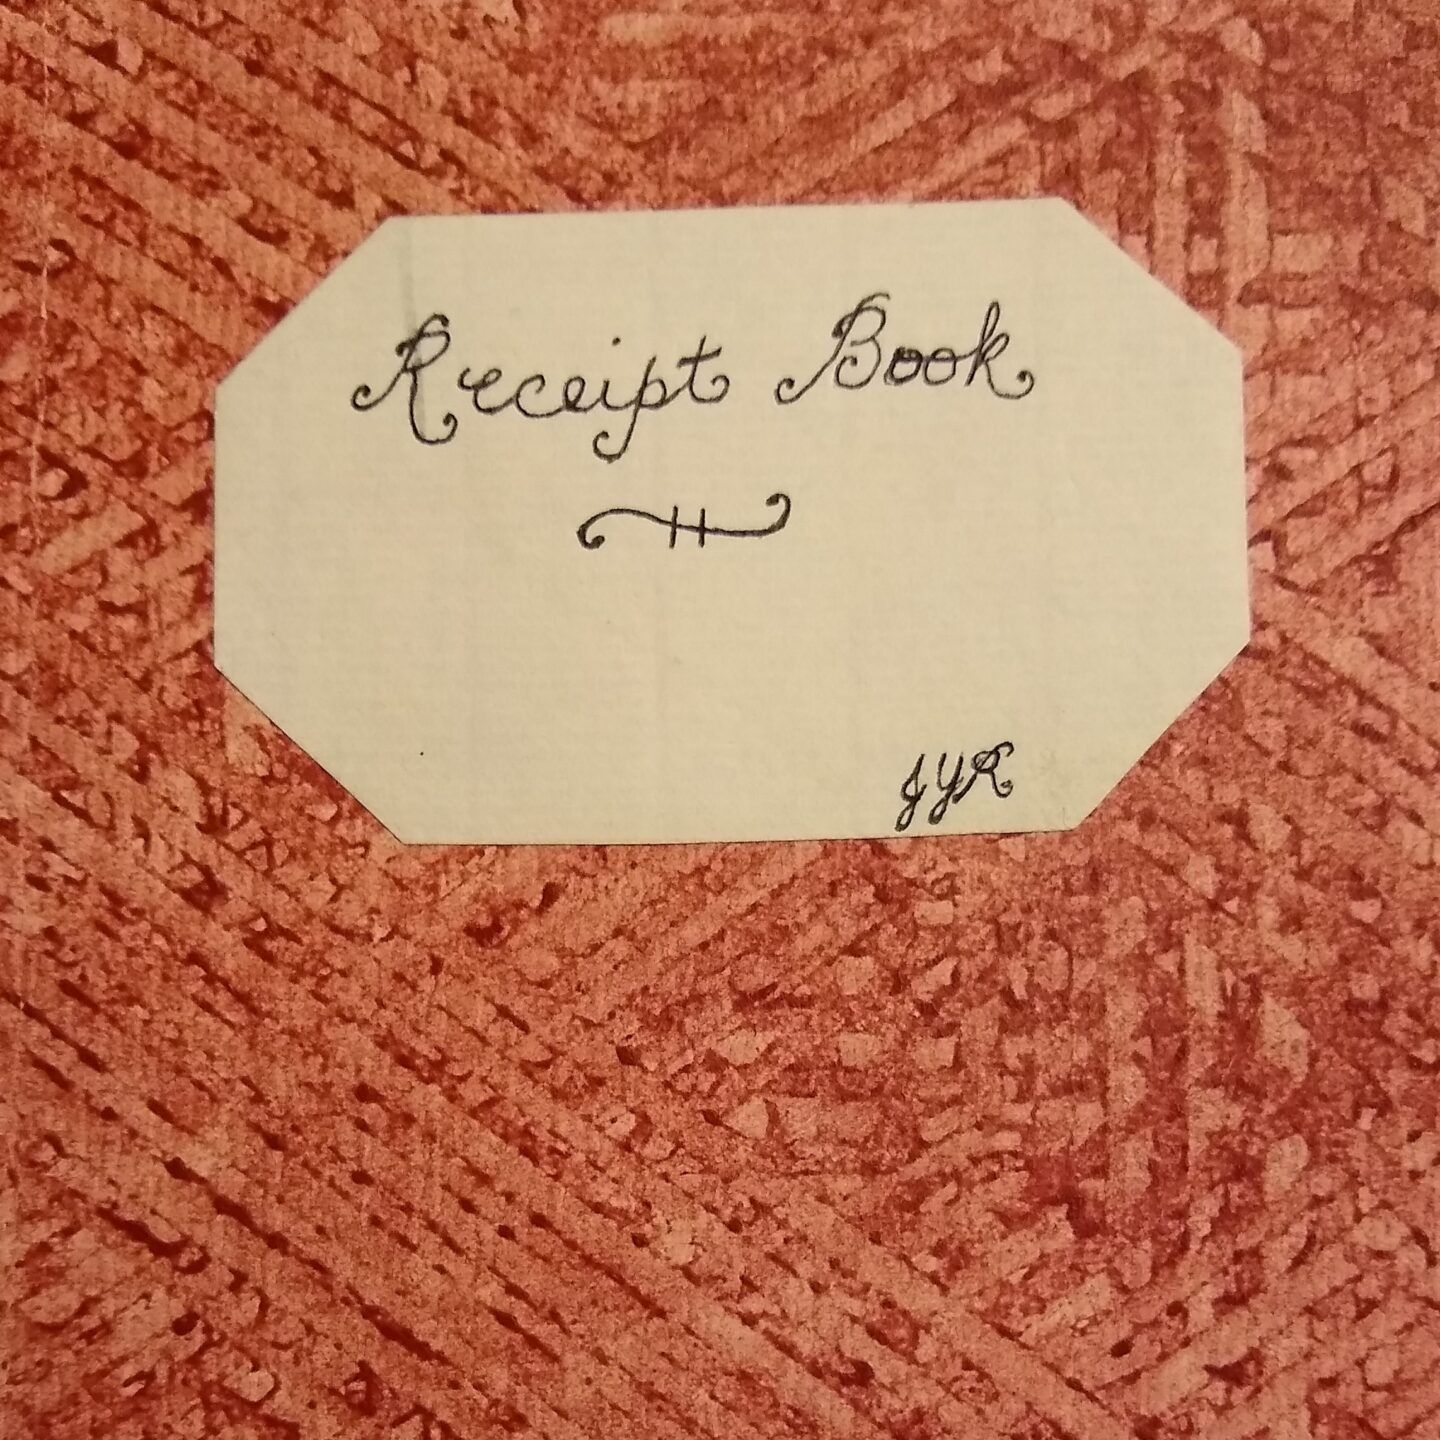
A quick discussion about my new header pic for recipe blog posts. I am still getting better at putting pictures at the top of my blog posts, and I also want to be very careful about copyright law. I either use Creative Commons pictures, or I use my own pictures on this website. For the blog posts that I have with recipes in them, I have created a new header picture to use of a receipt book I made when I worked at the museum. I think a lot of people might be a bit confused as to why it says Receipt instead of Recipe, so I thought I would do a quick explanation of the difference. Up until the mid 19th century, cookbooks had receipts, not recipes, in them. A lot of this had to do with cooking over a hearth. There was simply too much variability in cooking conditions to give specific instructions for how to cook. The authors had to be vague on instructions to take into account all the different conditions that might be present. The type of hearth being used, the wood type, the cooking vessels, the time of year (weather, humidity, temp, type of raw ingredients available, etc) would all create very different options for the home cook. Even today, most cooking shows will give instructions on how to test your oven temp with a good thermometer if your baking times are different than stated, and everyone who has cooked on different surfaces (gas, electric, and especially induction) knows how different they can cook for the same dish. Multiply these variables by several factors and you get the problem for the authors of 18th century cookbooks. So instead of a recipe with specific instructions, you had a receipt that listed the items you needed and guidelines for cooking them. There were often substitution options for different spices, vegetables, and containers, heat instructions such as a ‘slow’ oven vs a ‘quick’ oven, and the all purpose ‘cook until done’ for time. All of this meant that a cook needed to be skilled in understanding how a receipt would be applied for a particular kitchen and time.
If you want to see a typical 18th century receipt, here is one from England, describing how to make Pigeons in Paste–Fill the belly of the Pigeon with Butter, a little Water, some Pepper and Salt, and cover it with a thin light Paste, and then to put it in a fine Linen Cloth, and boil it for a time in proportion to its bigness, and serve it up. When this is cut open, it will yield Sauce enough of a very agreeable Relish.The Country Housewife and Lady’s Director, Richard Bradley, 1736. Try giving that to today’s cook and see what they say about it! After years of experience reading and using this type of receipt, I could make this without too much trouble, but I wouldn’t want to serve it to guests the first time I made it. However, this gives a good example of the types of instructions in a published 18th century cookbook. If you were to look at a manuscript cookbook, you might have even less. I have seen major ingredients left off that I know are part of it, because the writer assumed they would remember the obvious ones and didn’t need to record them.
So that is the difference between recipe and receipt. For my own cooking, I still look at recipes like I do receipts. They are more strong suggestions to achieve a particular outcome than they are strict rules. I am always happy to change things I don’t like, or want to do a different way. This is why I am a good cook, but only a reluctant baker. Baking is much less forgiving of guesses and ‘good enough’ measurements. Personally, I consider cooking an art and baking a science, though I am sure that bakers might disagree!
Icdnuolt blveiee taht I cluod uesdnatnrd waht I was rdanieg The phaonmeal pweor of the hmuan mnid Aoccdrnig to a rscheearch at Cmabrigde Uinervtisy, it deosn’t mttaer inwaht oredr the ltteers in a wrod are, the olny iprmoatnt tihng is taht the frist and lsat ltter be in the rghit pclae. The rset can be a taotl mses and you can sitll raed it wouthit a porbelm. This is bcuseae the huamn mnid deos not raed ervey lteter by istlef, but wrod as a wlohe. Amzanig huh? yaeh and I awlyas thghout sopeling was ipmorantt!
You might have seen this internet meme before; if you haven’t and it looks like gobbledy-gook, it works a lot like the Magic Eye images. The harder you try to figure it out, the worse it gets. If you are having trouble reading the above, don’t try so hard. This will be harder for non-native readers of English, but if you stop trying to read each word because it looks strange, and just let go and get started reading the first bit, it comes a lot easier (at least, I found it so). The reason I am putting this up is because it goes to my inner language geek. Just recently, I came across this (which I had originally hung in my office at work) and I had the time, so I looked it up to see if it actually came from Cambridge. Funny thing is, its the exact question someone from Cambridge asked! The answer, apparently, is that no one really knows who this originated from, though there has been linguistic studies into similar areas, and studies of how people learn language and how the brain translates words.
One of the professors who has worked in the Cognition and Brian Sciences Unit at Cambridge wrote up a blog post where he gives the history of the research into language learning he has found, and possible links to this meme. He does show how there are some tricks to the above process, which means that you can’t just use any way to mix up the internal letter order, and that the sentence design itself has a lot to do with how it can be read. He has also added all the different languages this meme has been created in. Some written languages do not work as well with this design (such as Chinese), because the structure of the writing doesn’t work the same as many of those based in Europe. However, some do, and the blog poster, Matt Davis, gives a good run down of the types of written languages he has found examples in. I am providing a link here for you, so you can read his studies yourself if you are interested. He last updated it in 2003, so it has been around for a while, but the information is still good, and very interesting if you are like me! Link Here.
Featured Image in Creative Commons-“Zine Study XIV: [language]” by Shawn Econo is licensed with CC BY-NC-SA 2.0. To view a copy of this license, visit https://creativecommons.org/licenses/by-nc-sa/2.0/