Scherenschnitte–one of the final words of the 2015 National Spelling Bee, and probably the only time I have ever been able to spell a word from that contest. (I am notoriously bad at spelling; I give myself comfort that Einstein is rumored to have been a bad speller, but it is definitely cold comfort!) Scherenschnitte is a word I had to spell frequently when I worked at a living history museum, where we would demonstrate the technique of decorative paper cutting from Germany and central Europe. There are a lot of different traditions of paper cutting and folding in many cultures, such as origami from Japan and the original paper cutting of China, but scherenschnitte is one of those that many people think of today, probably because it reminds them of cutting out paper snowflakes in elementary school. The technique was often used as gifts, or to decorate other items. Many people who practice it today will use an Exacto knife for very fine cuts, but I have always used small scissors. It doesn’t have to be difficult, just as making paper snowflakes can be very simple, but there are plenty of examples of very intricate designs that take skill and patience to complete. I am going to include several pictures of designs that I have cut, but it is fairly easy to copy a design for someone who wants to just try it out for fun.
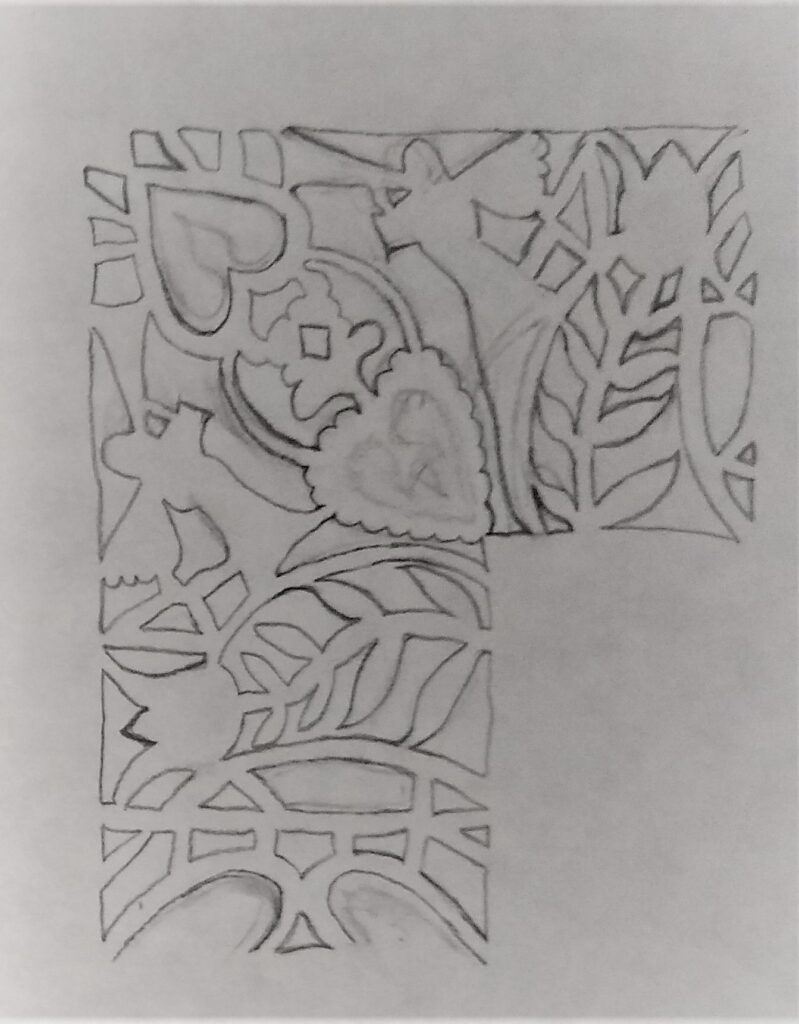
This is a quarter fold pattern with writing space in the center. If you look at the featured image of this post, you can see the cut design mounted on red paper.
The first thing to do with paper cutting is to make sure you pick the right type of paper. Very thin paper, while it is easier to cut, won’t hold up to the pressure that comes from cutting away much of the structure. If it isn’t strong enough, you will end up tearing the design, especially if you are doing a very intricate one. Stronger paper will also give a crisp finish, which looks a lot better for the amount of work you are going to be doing. The paper available in the 18th and early 19th centuries, when the practice was popular, was generally rag paper, which means that it was made of cotton, linen, or a blend of the two. Wood pulp paper became more common after the 1820s, but if you want to get an idea of how much stronger rag paper is, pull out the one that most people are familiar with, money. All US paper money is made of rag paper, 75% cotton and 25% linen. Linen provides a lot of strength to paper, and is why your paper currency can be put through the wash and still stay intact! All of this is to say, the best paper for making scherenschnitte has some rag content. I recommend a general 25% cotton, which is what good quality resume paper is made with. Even a thinner weight paper with this rag content will provide stability for the design. After that, it depends on how thick you want to cut through. If you just want to try this for fun, get some good quality resume paper and give it a try.
If you want to do much paper cutting, I recommend getting a small light board for tracing purposes, but you can also use a window for this (I always used a window when I was working in the museum), it will just get tiring if you want to do more than one or two of these. As for designs, you can find a lot of them online or purchase a book of designs, but you can also make up any design you want. The main thing is to remember to look carefully at your design so you know what paper is going to stay, and what is to be cut away. If you want, you can shade one part, and leave the other white; just make sure you know which is which! You will need a small pair of scissors that are very sharp and pointed. Do Not use scissors you keep for cutting fabric to cut paper. Cutting paper will dull scissors much faster than cloth, and will ruin good fabric.
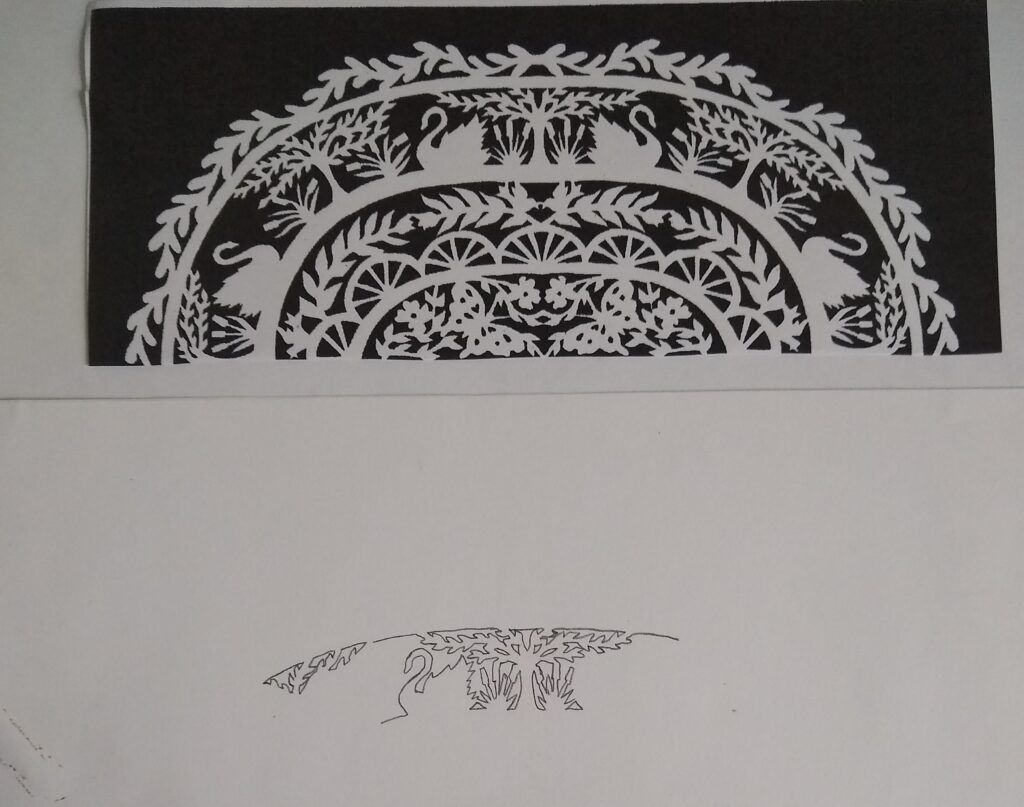
This pattern is from a set of cards I received for Christmas one year. I just took the design and traced it onto paper, and cut it out myself. This is a single fold design, with some intricate details. You can see where I started tracing the design for cutting in the bottom image. Before you start cutting, make sure you have firmly in mind what is cut away and what stays; you can’t put the paper back on if you make a mistake! You can also change these designs however you want. Leave out the middle details to gain a space for writing, for instance, or just use the very outer design to create a lacework edging.
Most of the designs I have done are traditional styles, which usually means they are folded once or twice, and then opened up after cutting to reveal the repeated design. You will find paper cut designs that are done without folding, often of scenes, and these are often done with a knife rather than scissors. If you like those, feel free to try them, but I won’t show any of them here, since all of the originals that I have looked at are folded designs. You can paint or color the designs after they are done, but I like the plain color ones, with a contrasting color of paper for mounting to show the design. Many of the original ones were given like we give cards today, including as Valentine’s greetings, so many of them would include a space left for writing, but I have also seen them with writing on the delicate edges of a filigree heart.
The technique for drawing and cutting is to start by tracing or drawing your pattern. I am not an artist, so I will always trace a pattern. If using a window, just secure your pattern behind your paper (making sure to allow room to fold the paper you are cutting, i.e. place the pattern at the top of a page to fold in half, not in the middle of the paper). Hold or tape the paper and design to a window at a comfortable height to draw, and then trace the pattern onto your cutting paper. Once you take off the pattern, fold your paper in half or in quarters along the fold edge of the design, then look closely at your design for where to start cutting. The best technique is to cut from smallest areas to the largest areas. This gives you the most stability, keeping the bulk of the paper intact while you work, and leaving cutting out the biggest portions until the end, which lessens the risk of tearing the paper. The outside edges of the design are the last thing to cut away. There is also a trick I learned that you might find useful. The amount of pressure to push the scissors through the paper can cause tearing even when you are being very careful. I take a straight pin and poke a hole in the middle of all of the cut-out areas before I start. This takes a little more time, but makes it much easier and safer to cut even the smallest areas, because you have created an opening for the tip of the scissors without much pressure being applied. The tip of a straight pin is much finer than the best scissors, and takes much less pressure to pierce the paper. The other trick to remember is that the paper moves forward, not the scissors. This may sound strange, but try it before you start. Take your scissors and push them into the center of a piece of paper. Now start the cutting motion with your scissors, but don’t move them forward or back. Instead, use your other hand holding the paper to push the paper gently into the motion of the scissors. This is what you want to do with paper cutting. You will only be using the very tip of the scissors to cut with, so there really isn’t much point to trying to push the scissors forward into the paper. It may seem a little strange at first, but if you practice, you will find much more control by pushing the paper into the scissors, instead of the other way round! Just remember, this isn’t like cutting large pieces of paper in half; you will be making very small cuts with your scissors, so you want to control the motion much more than usually done with cutting.

This is a Christmas design that I have cut out numerous times to frame and give as gifts. It is also a single fold design. Again, changes can be made, such as leaving the top medallions solid for painting or writing in. On something like this, cutting the smallest areas first is best, to keep as much stability as long as possible. It would also be a good idea to color in the areas to cut out, so you don’t remove parts of the design you want to keep.
When you are finished with the Scherenschnitte design, you can either give it to someone as is, or more commonly, mount it on a contrasting color paper backing to frame. I have used dark jewel tones of cover weight paper to mount designs on before framing, but you can also cut the design out of a darker paper and mount it on a light backing if you want. (Seeing the design to cut out is easier on light paper, but using a white lead pencil on dark paper is also possible.) When putting the design onto its backing, it is best not to put the glue onto the design, which will cause it to tear or wrinkle. Instead, use a drier glue like a gluestick to put the glue onto the mounting paper, and then carefully place the design onto the glue area. This is a tricky part of the presentation, because it can be easy for the delicate design not to lay flat if you are not very careful. I recommend using a low heat iron to flatten out the Scherenschnitte design before mounting it. This is also where using a good quality paper will help, since it is less flimsy, and won’t twist around easily when placing it on the glue. Make sure you have the design centered on the paper before applying glue, and marking the area for the design before applying the glue on the mounting paper is often a good idea. Be very careful not to pull in any one direction as you place it gently down on the glue covered mounting paper; one technique is to have a center line to use as a guide, and set the cut design centerpoint gently down on that first, then allow the two sides to just fall to the paper. This will keep you from shifting the design from top to bottom or side to side, which can cause it to bunch up onto the glue base. You will have a few minutes to make any adjustments to small points on the cut design while the glue is still moist; using a straight pin to shift small points is the safest way. Press gently with your hand to ensure it is stuck on the glue, and you could put a slick covered book on to press it for about 30 minutes. DO NOT put a piece of paper or other cover that could stick to the glue on top of the still wet glue-and-design. There is no way to remove other paper getting stuck to the glue on the mounting paper without destroying the cut design. That is a lot of work to destroy at the very end! If in doubt, just let it dry completely without any weighting, and press after the glue is dry. Frame and enjoy!

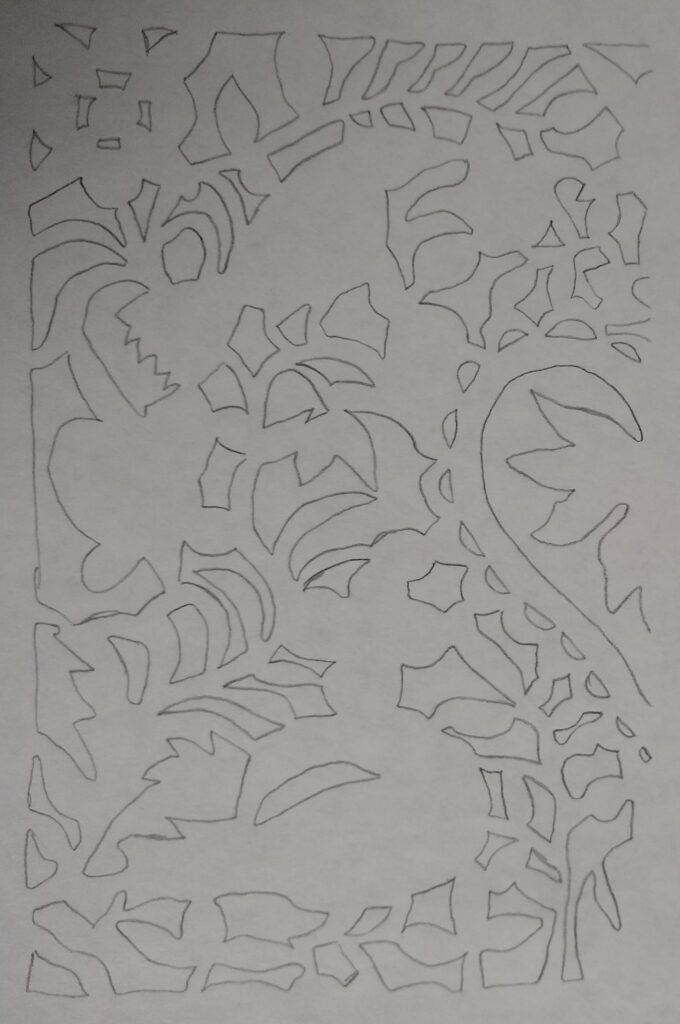
This is a quarter fold pattern. Quarter folds are a little bit more difficult to cut, since you have four pieces of paper to cut through at once, but they are usually less complicated. They also take less time, since you are creating twice as much of the design area with each cut.